

Balancing Motherhood and a Career as a Colorado Wedding Photographer
Balancing Motherhood and a Career as a Wedding Photographer
Being a mom of young kids is a rewarding and demanding role on its own. When you add a career as a wedding photographer in Colorado into the mix, finding a balance can be challenging. However, with careful planning, time management, and self-care, it is possible to thrive both as a mom and a wedding photographer. I’m often asked how I do it all (which, lets be honest - do dads ever get that question? But, that’s a topic for another time).
Set Boundaries and Prioritize
Setting boundaries and knowing your priorities is crucial to finding balance. Identify your non-negotiables as a mom and as a wedding photographer. Determine the times and days when you are fully present for your children and establish specific working hours for photography. Communicate these boundaries to your family, clients, and colleagues, so they understand and respect your schedule.
I currently have set “admin hours” Tuesdays before noon, and Fridays after noon. Obviously I work outside those hours but having a set time that I’ll do timelines, respond to emails, have client calls etc. really helps with my scheduling and stress levels.
Create a Schedule and Stick to It
Creating a schedule can help you manage your time effectively. Set aside dedicated blocks of time for your photography work, family time, and self-care. Ensure you have a good balance between work and personal life. During your work time, stay focused and be efficient to make the most of the time you have. When you're with your children, give them your full attention and create meaningful moments together.
I have a gym membership where I can take my littles to day care or play with them at the pool. We also utilize trampoline park memberships and museums to make sure the time I spend with my family is full of fun and even educational components.
Delegate and Ask for Help
Recognize that you can't do everything alone. Seek support from your partner, family members, or trusted friends. Delegate tasks that can be outsourced or ask for help with childcare when needed. Having a strong support system can alleviate some of the overwhelm and give you the space and time to focus on your photography career and spend quality time with your kids.
This is genuinely where I struggle the most - firstly, my husband and I both have our own businesses so it’s a difficult balance of “whose time is more valuable.” We struggled with scheduling, budget and child care balance until we sat down and made a list of tasks and delegated out the big ones. My biggest advice for couples dealing with a self employment or house management issue is to look into Fair Play Method - there are games, books and documentaries about it.
Practice Self-Care
Self-care is essential for maintaining your well-being and managing the demands of motherhood and a career. Set aside time for self-care activities that recharge and replenish your energy, such as exercising, meditating, reading, or pursuing hobbies outside of photography. Prioritizing self-care not only benefits you but also allows you to be a better mom and photographer. To prevent burn out I’ve picked up new hobbies (Important note: you do NOT need to monetize all your hobbies, they can be for fun - try that before you just try to make money)
Streamline and Automate Your Workflow
Finding ways to streamline and automate your photography workflow can save you precious time. Utilize tools that help you manage client communication, automate social media posting, or streamline editing and album design processes. By optimizing your workflow, you can create more efficiency and free up time for other aspects of your life.
I use Honeybook for my workflows and customer management, click here for 25% off.

Learn to Embrace Flexibility and Adaptability
Being a mom and a wedding photographer requires flexibility and adaptability. Understand that not everything will always go according to plan, and unexpected challenges may arise. Learn to embrace flexibility and be willing to adjust your schedule and expectations as needed. Having a positive and adaptive mindset will help you navigate the demands of both roles.
When things get tough and balancing both roles feels overwhelming, remind yourself why you chose to become a wedding photographer and a mom. Keep your purpose and passion in mind as motivation to push through challenges and find joy in both your photography career and motherhood journey.
Finding balance between being a mom to young kids and pursuing a career as a wedding photographer is a constant juggling act. By setting boundaries, creating a schedule, asking for help, practicing self-care, streamlining workflows, and embracing flexibility, you can find harmony in both roles. Remember, finding balance is personal, and it may take time to find what works best for you and your family. With patience, perseverance, and a supportive mindset, you can thrive as both a mom and a wedding photographer.
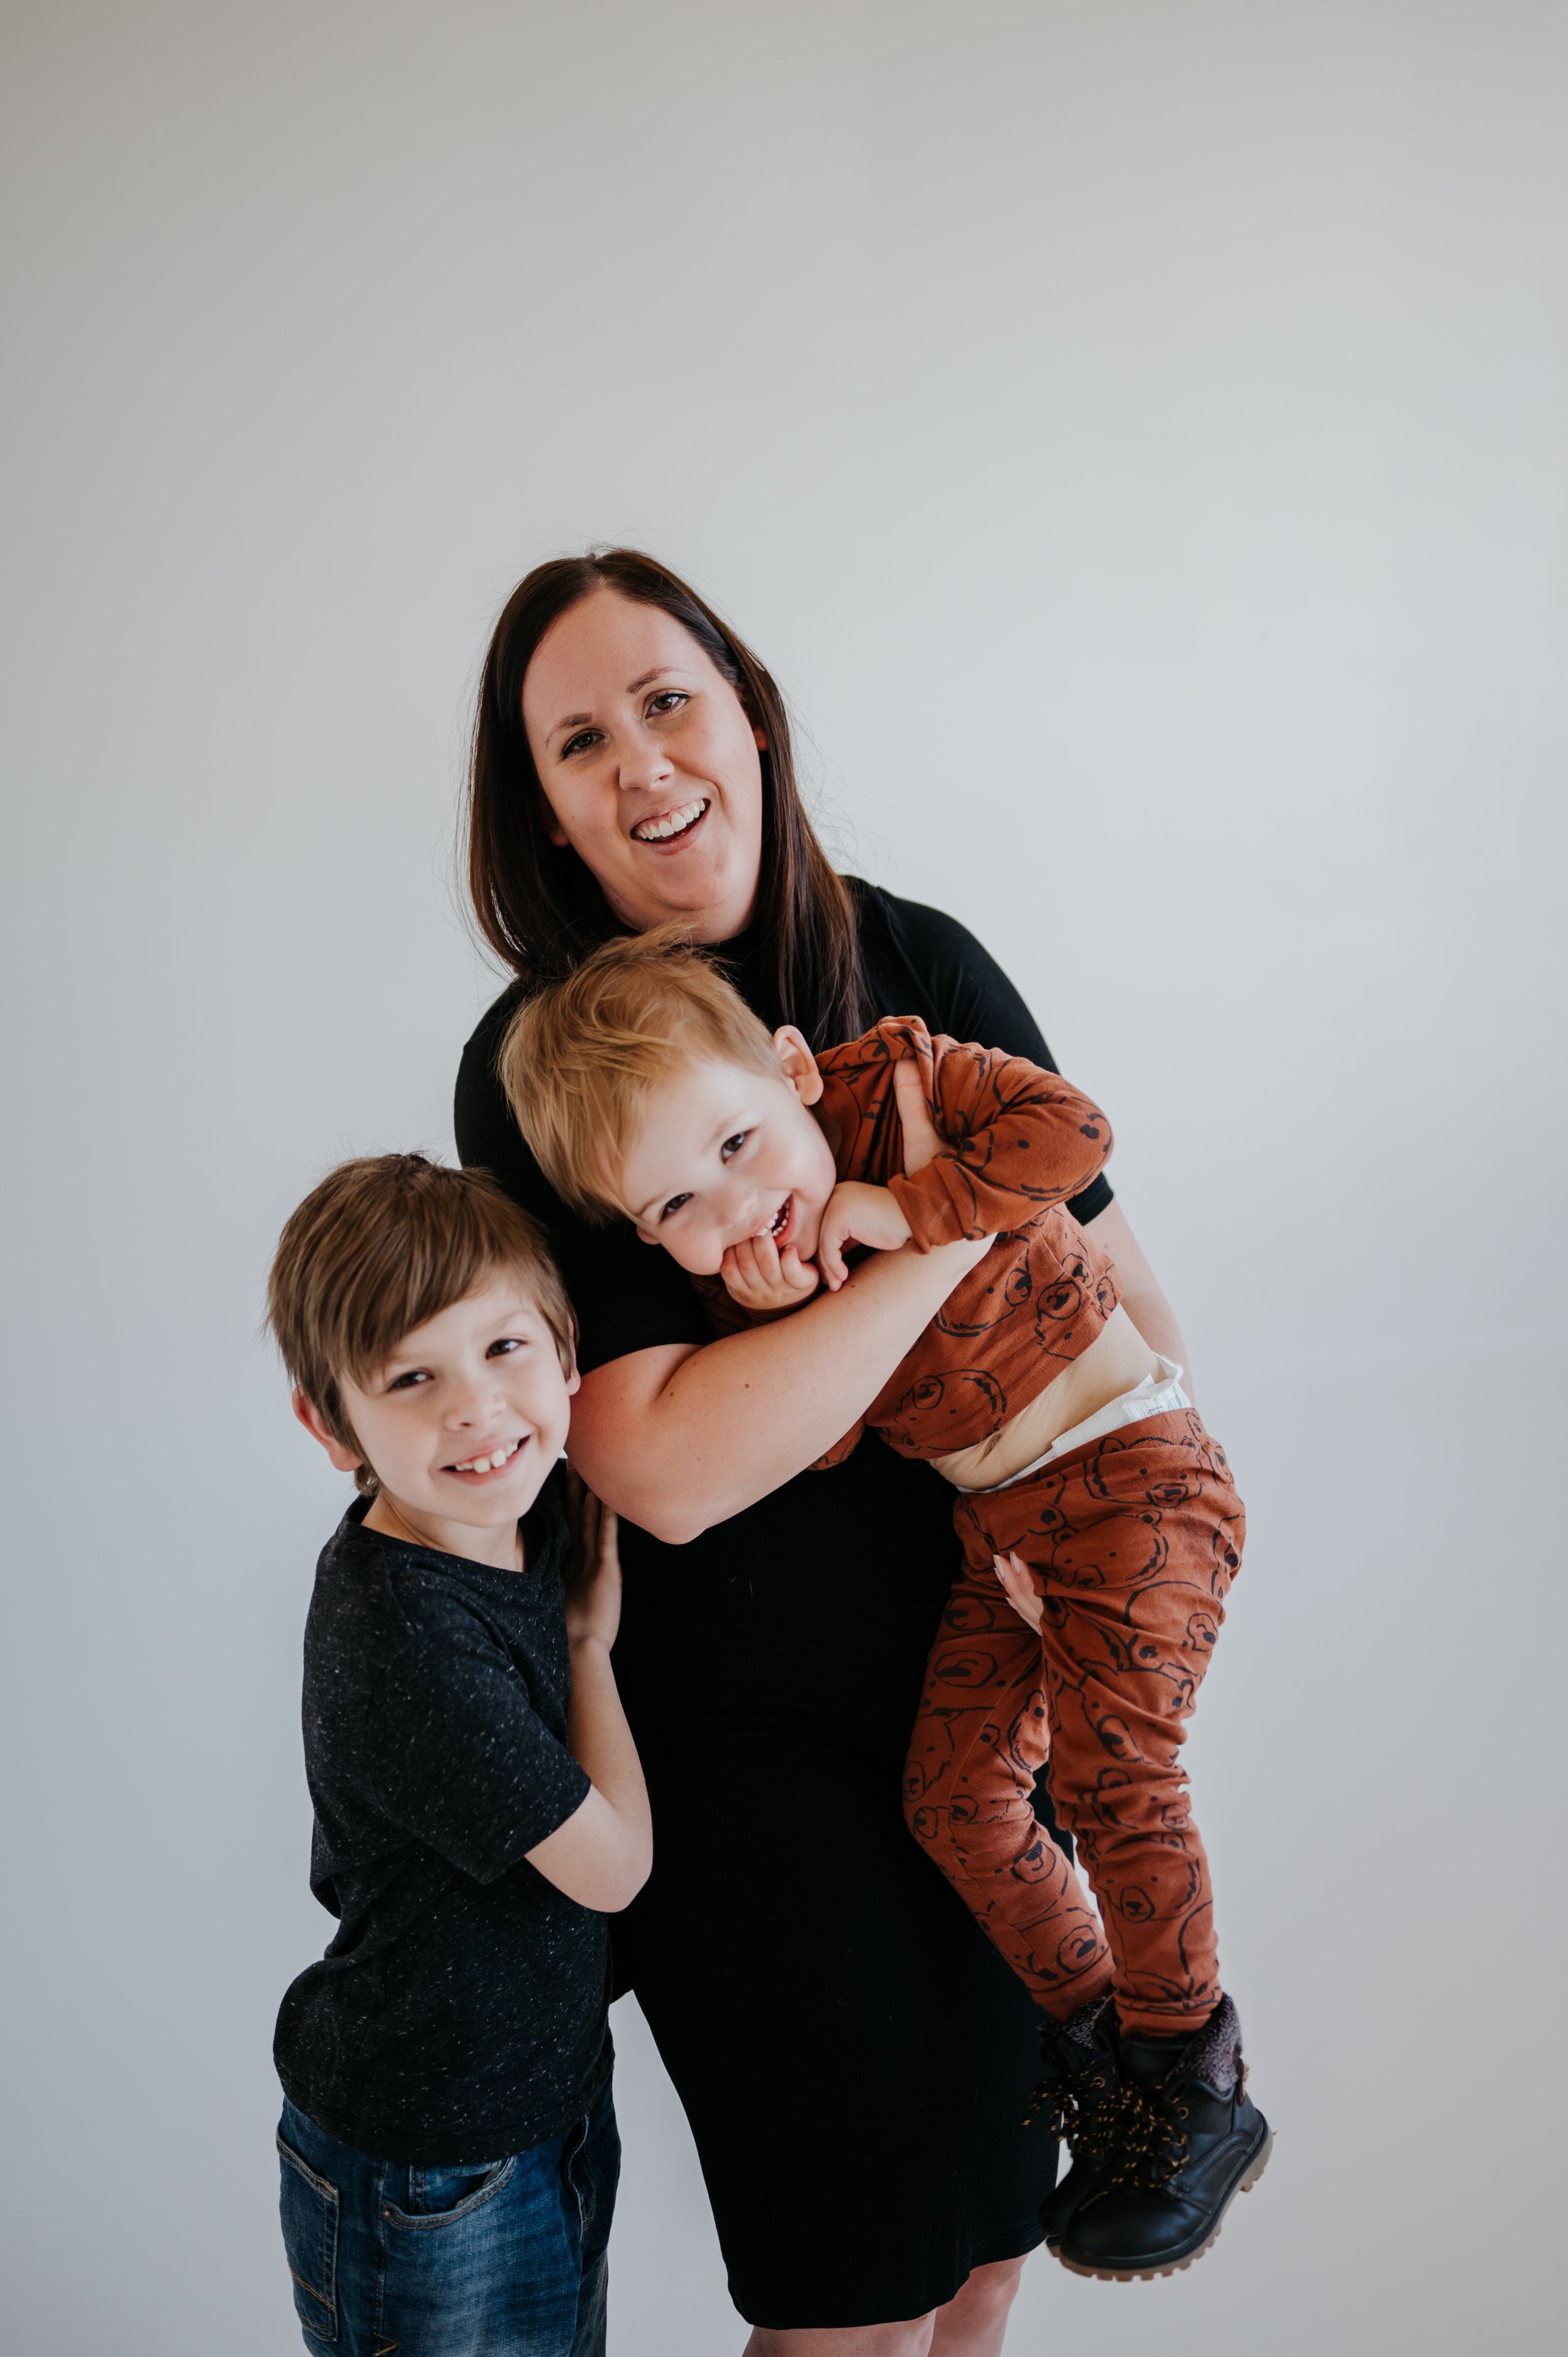
P.S Thank you to Courtney Jewell for taking these adorable photos :)

Etsy Resources | How to Print Your Etsy Art Printables
Printing Options For Your Digital Print Purchase
A common question I receive is, how do I print my purchase? You can always order prints through me here, my fine art prints are professional giclee prints with a variety of paper options. However if you prefer to print yourself (sometimes it’s a most cost effective or quicker option!) here are some good options especially if you’re doing the 16x20 size.
Please note: I have not tried out all of these print options and paper changes, quality and art replication can be different piece to piece. I plan on doing a comparison post of these options so stay tuned!
Artifact Uprising - My Favorite
With a huge selection of print options, artifact uprising creates truly beautiful prints and art. They are a higher price and a bit of a turnaround time but it’s totally worth it.
PS - Use the this link and get $20 off your first order!

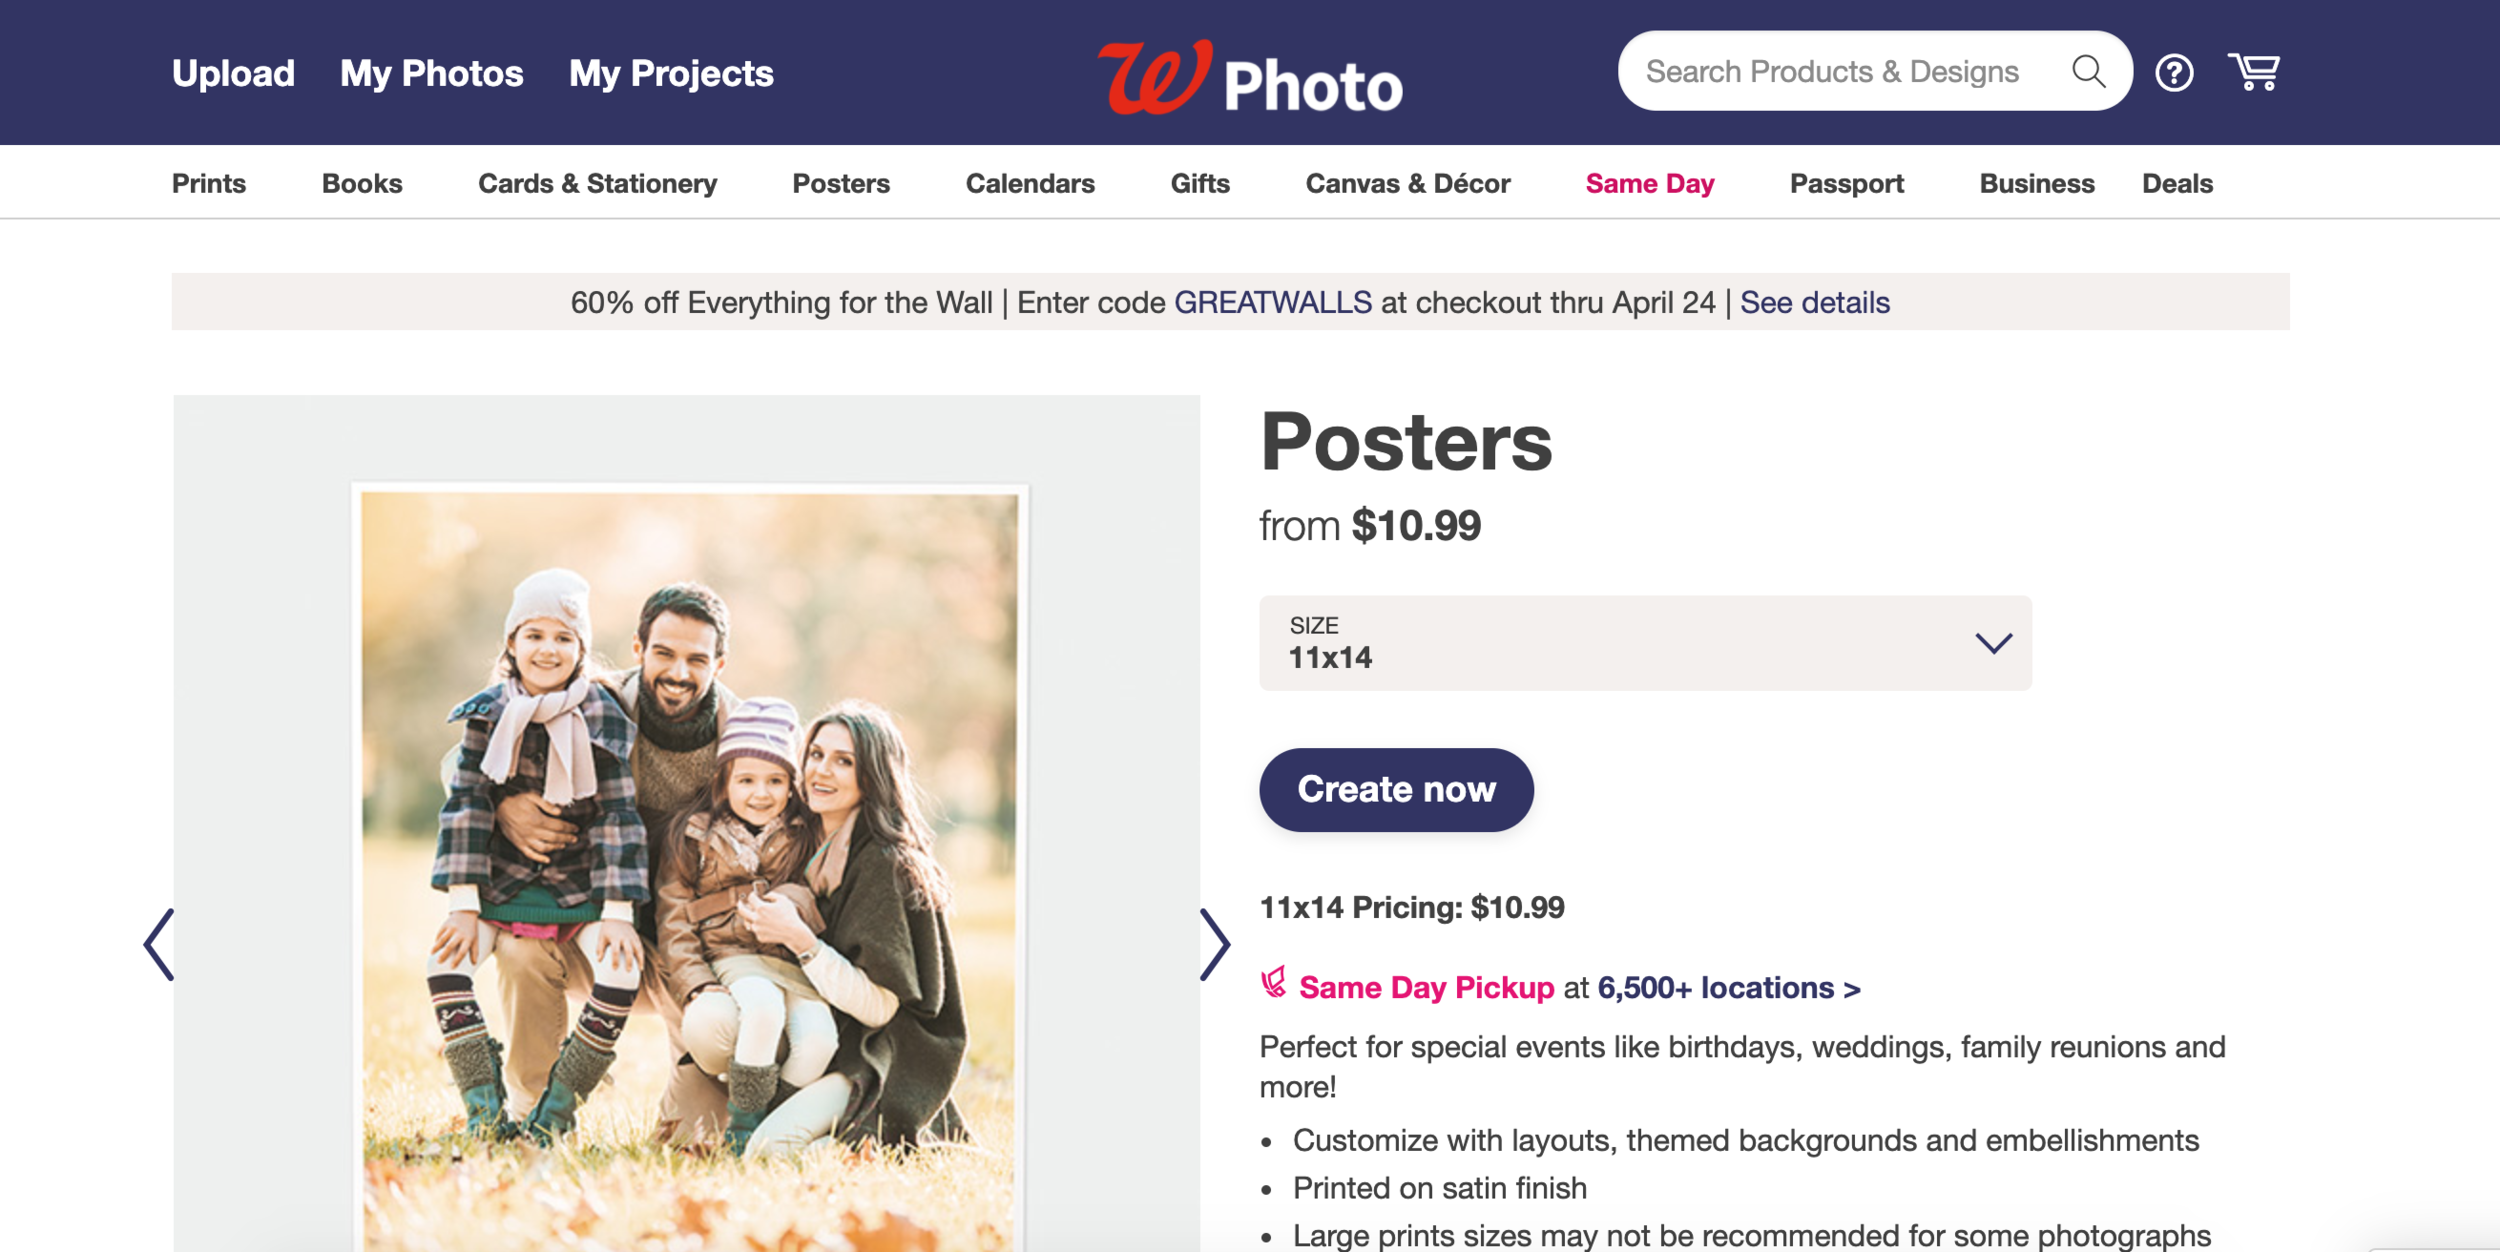
Walgreens
Select poster size to create a poster print at a reasonable price, most locations also have same day pickup!
Vistaprint
Poster options with paper changes available.

Shutterfly
Select ‘upload your own design’ to create your own art print.


Etsy Education | Easy Pinterest Tips to Grow Your Etsy Business
Beginner Pinterest Tips | One of the most common questions I get regarding Etsy SEO and marketing is how do I start using Pinterest in my marketing strategy?
Beginner Pinterest Tips | One of the most common questions I get regarding Etsy SEO and marketing is how do I start using Pinterest in my marketing strategy?

Okay, lets start with some quick steps you can take with Pinterest to be sure you're utilizing it to the highest potential or at least more than you are now.
1. Be sure you have a business account and link your Etsy shop to it (Create or change to business account then go to edit profile > claim > add Etsy)
2. Install a plug in to your browser or use a service like tailwind to be able to pin each image of your listing not just the main one (Google chrome has a free plug in which then makes any image a pinable image). You can pin from each image and each listing, see image below for an example of the share buttons under listing tools. To save each image directly once you have the plug in installed, hover over the image with your curser and a pin save button will appear.

3. Add descriptions to your pins so users can search and find the pin easily, when you save via Etsy it will default to your listing description which is also fine to leave as is as long as you’re using SEO for appropriate listing titles and providing good, clear descriptions. Example below has the default pulled description:

4. Have visual and well made mockups or photos of your products so Pinterest recognizes the quality images. This should seem obvious but a cohesive and clear description along with high quality images of your products will provide the pinterest pinner and the purchaser a better idea of what they’ll receive.
Want to know how well your Pinterest pins are doing?
Once you've claimed your Etsy and are pinning images regularly from your shop you can check you business Pinterest analytics on them which show how many people are clicking the pin to your Etsy listing and how many are saving, you can also see what types of boards people are saving to for more information on who is looking at your work.

Also check your Etsy stats and check under social media which will show what percentage of traffic is coming from Pinterest.

Hope this helps! Feel free to ask me questions

How to Make Home Decor | Easy DIY Art Project | Etsy Education
How to Make Basic Home Decor for Yourself or Your Etsy Shop | Etsy Education Molly Margaret Studio
Ready to start designing your own home decor or need some help making Etsy prints to sell? Make your own home decor like you find on Etsy using free resources.
Resources used
Free Font Options: Dafont.com
Paid Font Options with Commercial Licensing: Creativemarket.com
Adobe Photoshop Apple Pages
How to Make Basic Home Decor for Yourself or Your Etsy Shop | Etsy Education Molly Margaret Studio
Ready to start designing your own home decor or need some help making Etsy prints to sell? Make your own home decor like you find on Etsy using free resources. See below for step by step instructions on how to begin making unique art for your home, friends or even as a business!
Here’s what we’ll be making today, this is a great tutorial to base more design work on or to make your own home decor using custom quotes or meaningful words for you.

Resources used:
Free Font Options: Dafont.com | Paid Font Options with Commercial Licensing: Creativemarket.com
Adobe Photoshop | Apple Pages
Any questions? Comment below!

Before you get started | Research and select a font to use (if you don’t have one you love already)
You can select from many free fonts for personal use on dafont.com or go to Creative Market for great paid options that will come with a commercial license if you plan on selling the prints.
I like to use handwritten style fonts, script fonts or modern fonts.
To download fonts in Mac:
Open the folder (unzip first if needed) that downloaded from either site and contains the new font, double click the .ttf file - this will open your font book, select install font
To download fonts to a PC:
If you have Windows 10, open the folder that contains the new font, right click the font file and select install


Another great thing about Creative Market are their weekly free design products, it’s absolutely worth signing up for their notifications.

Photoshop Instructions:
If you plan on making digital art in photoshop, which I recommend if you’re trying to sell the art or want to print large scale projects, check out these instructions. If you don’t have access to photoshop or have no idea how to even open a new project there - scroll down to the Apple Pages instructions, which are easy to reflect into Microsoft Word.
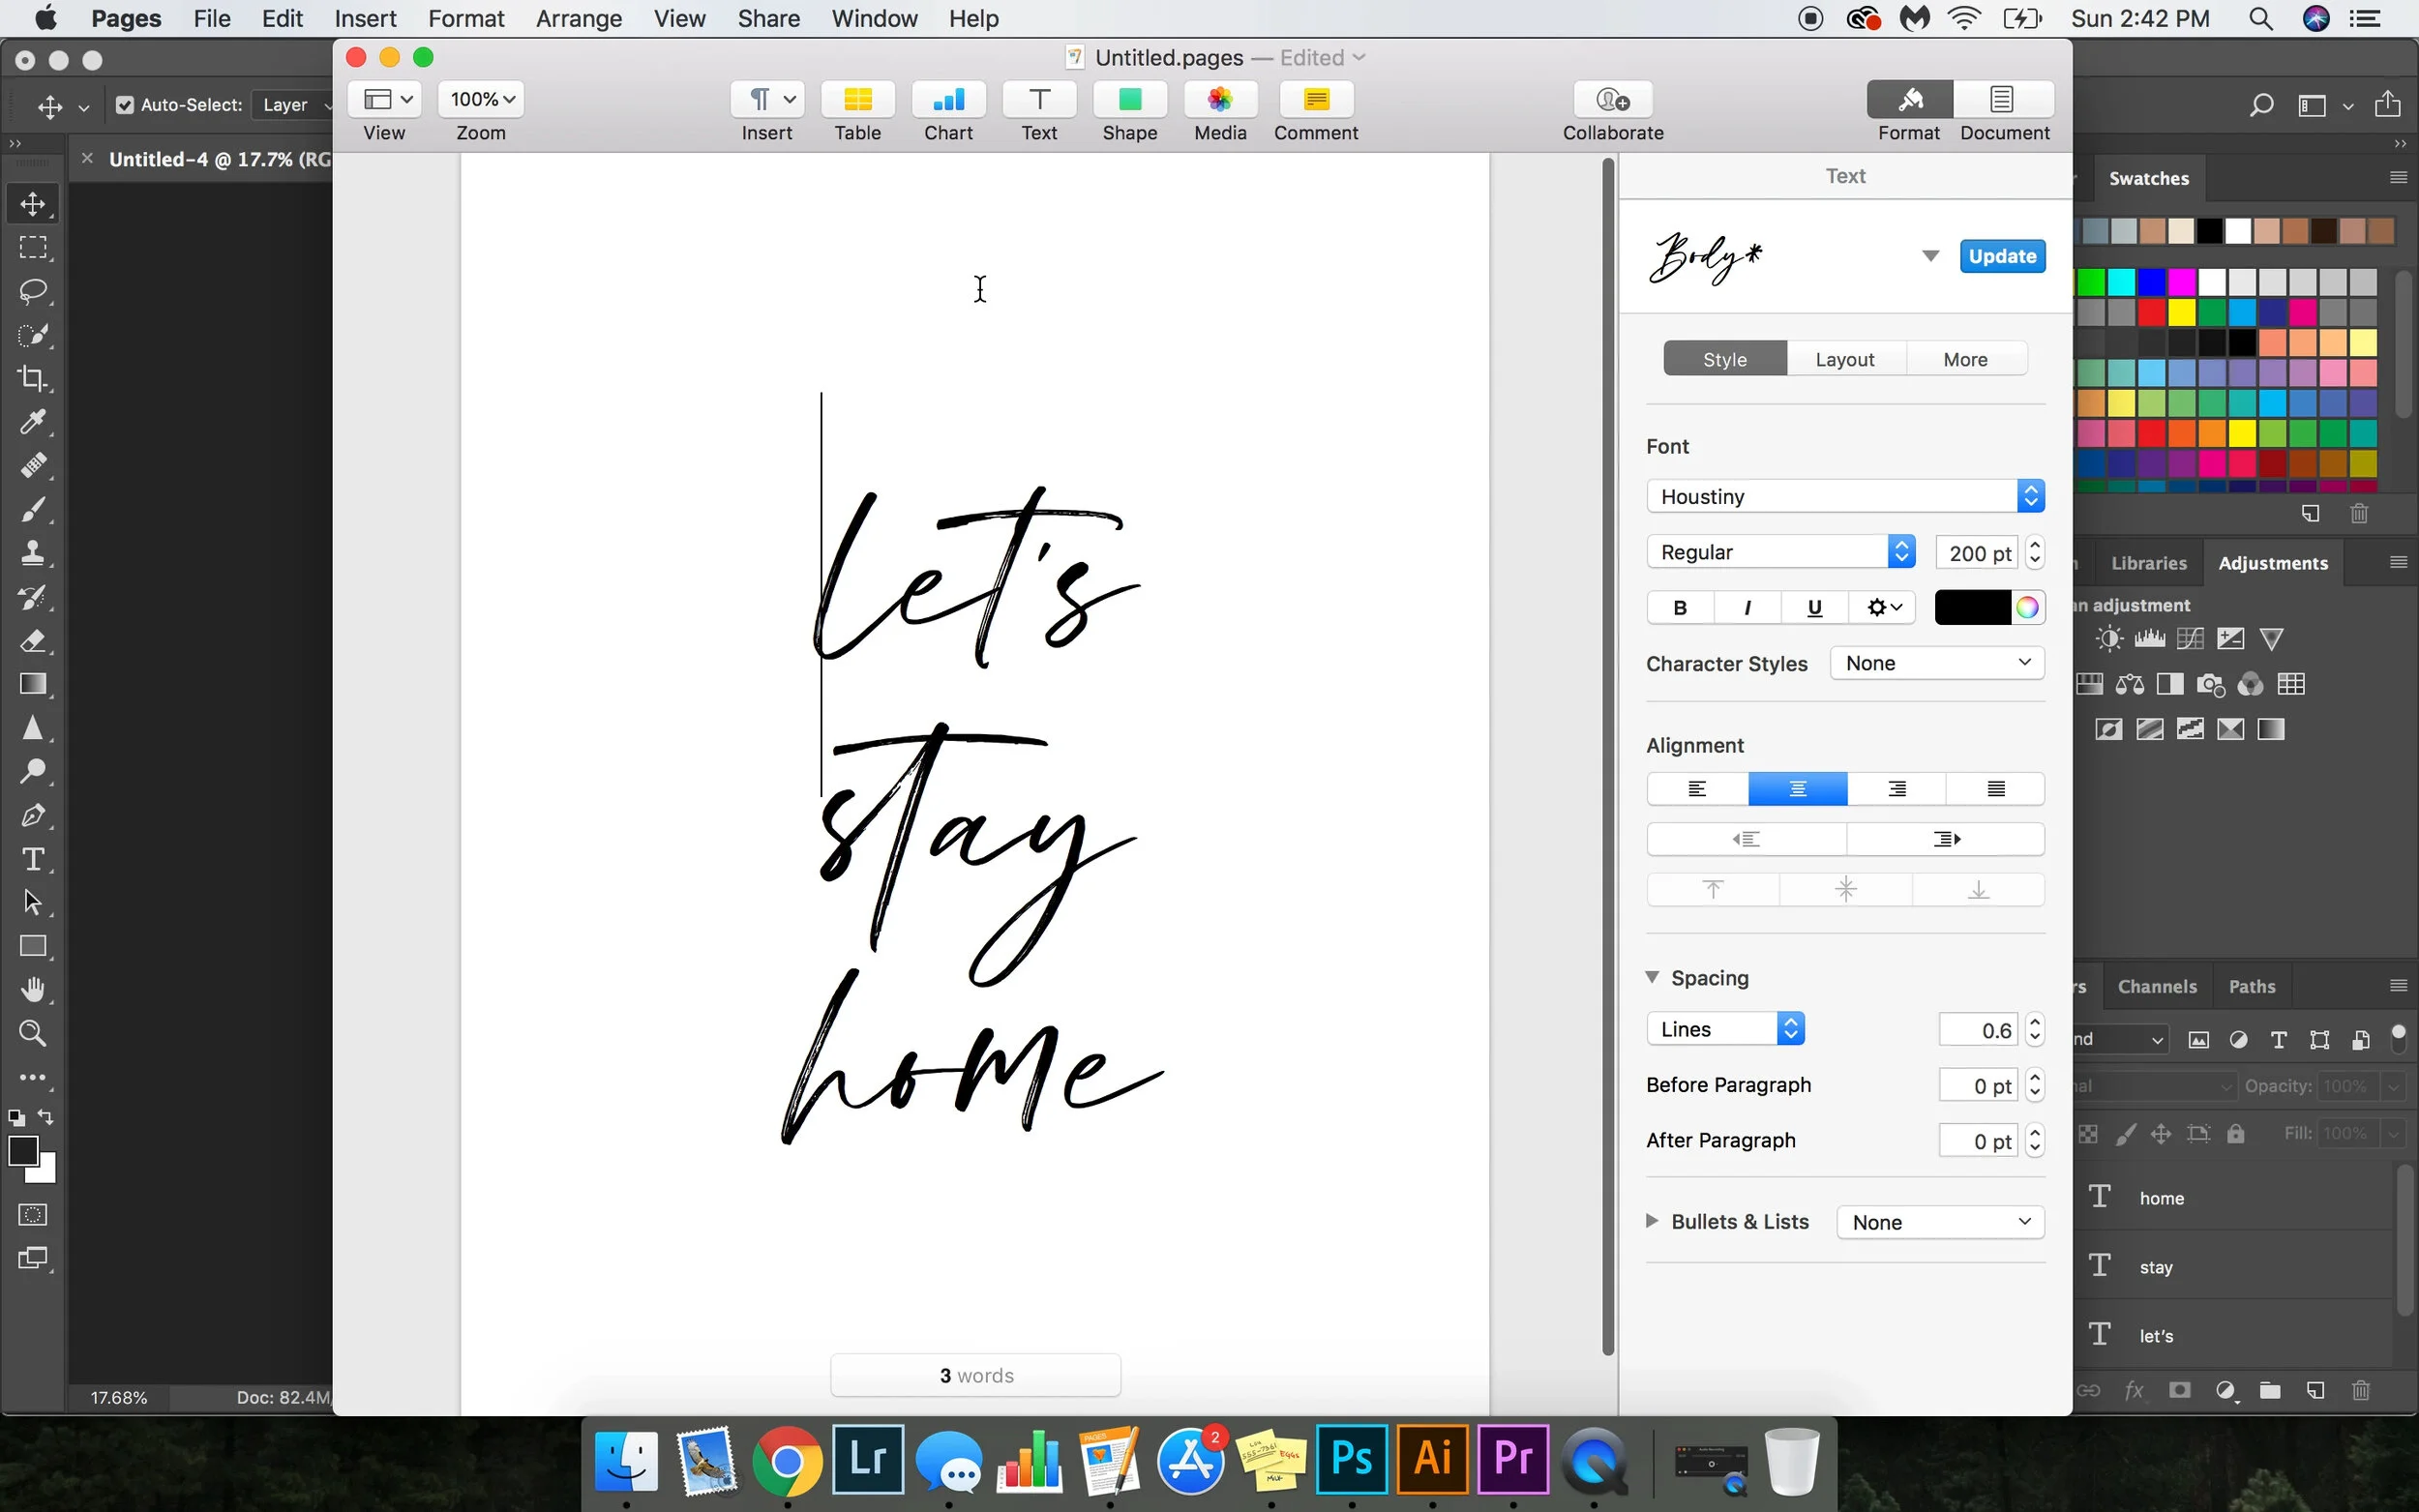
Step One | Open a new white background document sized 16x20 (or whatever size you’d like your image to be) 300 dpi (default setting anyway but good to check just in case).

Step Two | Using the horizontal type tool, make three separate text boxes or layers with the words let’s stay home - or whatever words/phrasing you’d like.
I explain it a bit more in the video, but keeping each line or word of text on different layers help you maintain more control over the final look of the project through individual word size changes, position etc.

Step Three | Select all three layers using the move tool and adjust the size by selecting a corner square of the transform controls (the box that shows up around the words) and while holding the shift key - make the box smaller or larger. At this time I also center the words together.

Step Four | Ta-Da! It’s done! It’s that easy.
If you want to sell the print be sure to save it at a high quality size, I even keep photoshop file copies in case another size is requested so I can easily adjust the sizing without sacrificing the quality of the print.

apple pages Instructions:
If you don’t have access to photoshop or don’t want to pay for the subscription through Adobe, you can easily use Apple Pages or Microsoft Word to create your prints for personal use.
Step One | Open a new document - it’s convenient that apple pages defaults to a regular printer paper sized document, you can easily cut the paper to fit your frame or adjust the print sizes in the program.

Step Two | Type out the phrase you’d like to print.

Step Three | Change the font to the one you downloaded and the size.

Step Four | To make your design look more professional, make adjustments to the line height which will bring the words closer together or further apart.

Step Five | Center your text and add spacing above and below it as needed. (You can also just make it all in a text box and move with your curser)
Step Six | It’s done! Print and put in an 8x10 frame, enjoy!

I hope you enjoyed this tutorial! Let me know if you have any questions.

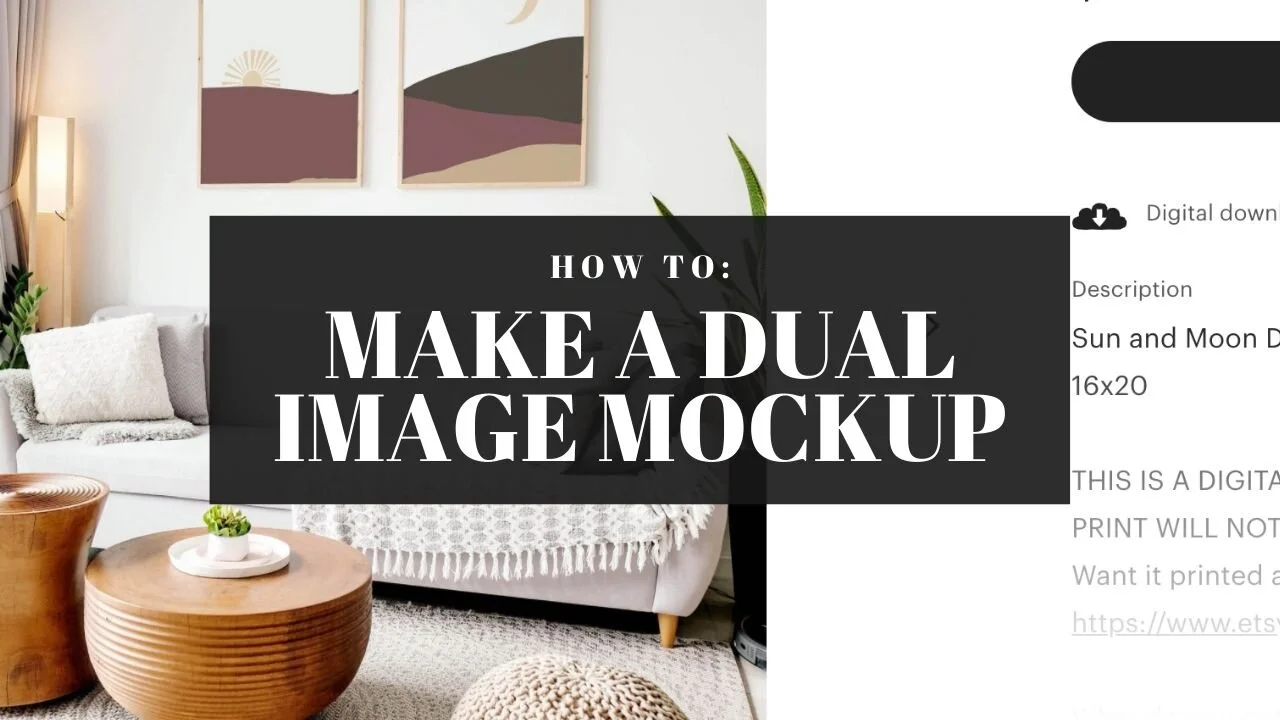
How to Make a Dual Image Mockup | Etsy Help
How to create a two frame mockup for your Etsy artwork | Molly Margaret Photography Education
As you may have seen, I regularly post my Etsy artwork and to share it I use what are called Mockups - you can purchase these but they’re also fairly easy to make on your own. Here is a tutorial video and some written instruction on how to make a two frame dual image mockup for your Etsy shop. Let me know if you have any questions in the comments!
The video tutorial:
The written steps:

Step One: Prepare the Image.
Edit out any distractions, set a background to the picture frames.

Step Two: Select the areas for art to sit in the frame using the Marquee Tool.
Select a rectangle or square within the existing frames, as close to the actual frame interior as possible but it does not need to be perfect.


Step Three: Right click to create a new layer via copy

Step Four: Right click the new layer and convert it to a Smart Object.

Step Five: Repeat for the other frame, the final of the two new layers correctly converted will look like this -

Step Six: Select the smart object thumbnail to open the smart object.
You’ll see whatever was copied when the new layer was created with the marquee tool, go ahead and create a new layer then delete that layer with the copied content.


Your updated smart object should look like this -

Step Seven: To place in your artwork go to File > Place Embedded > Select the file you’d like to place + Press Enter once it’s placed.

Here’s what it looks like with the design in place, press control S to save the smart object (or File > Save)

Step Eight: Confirm the smart object has pulled over the piece of art/design and that Transform Controls are ON.(Show Transform Controls in the upper left on the top control panel)

Step Nine: Adjust the file to fit into the frame Edit > Transform > Distort then drag the corner of the art to be flush with the frame. Press enter when it fits to your liking.


Step Ten: Repeat for the second image.
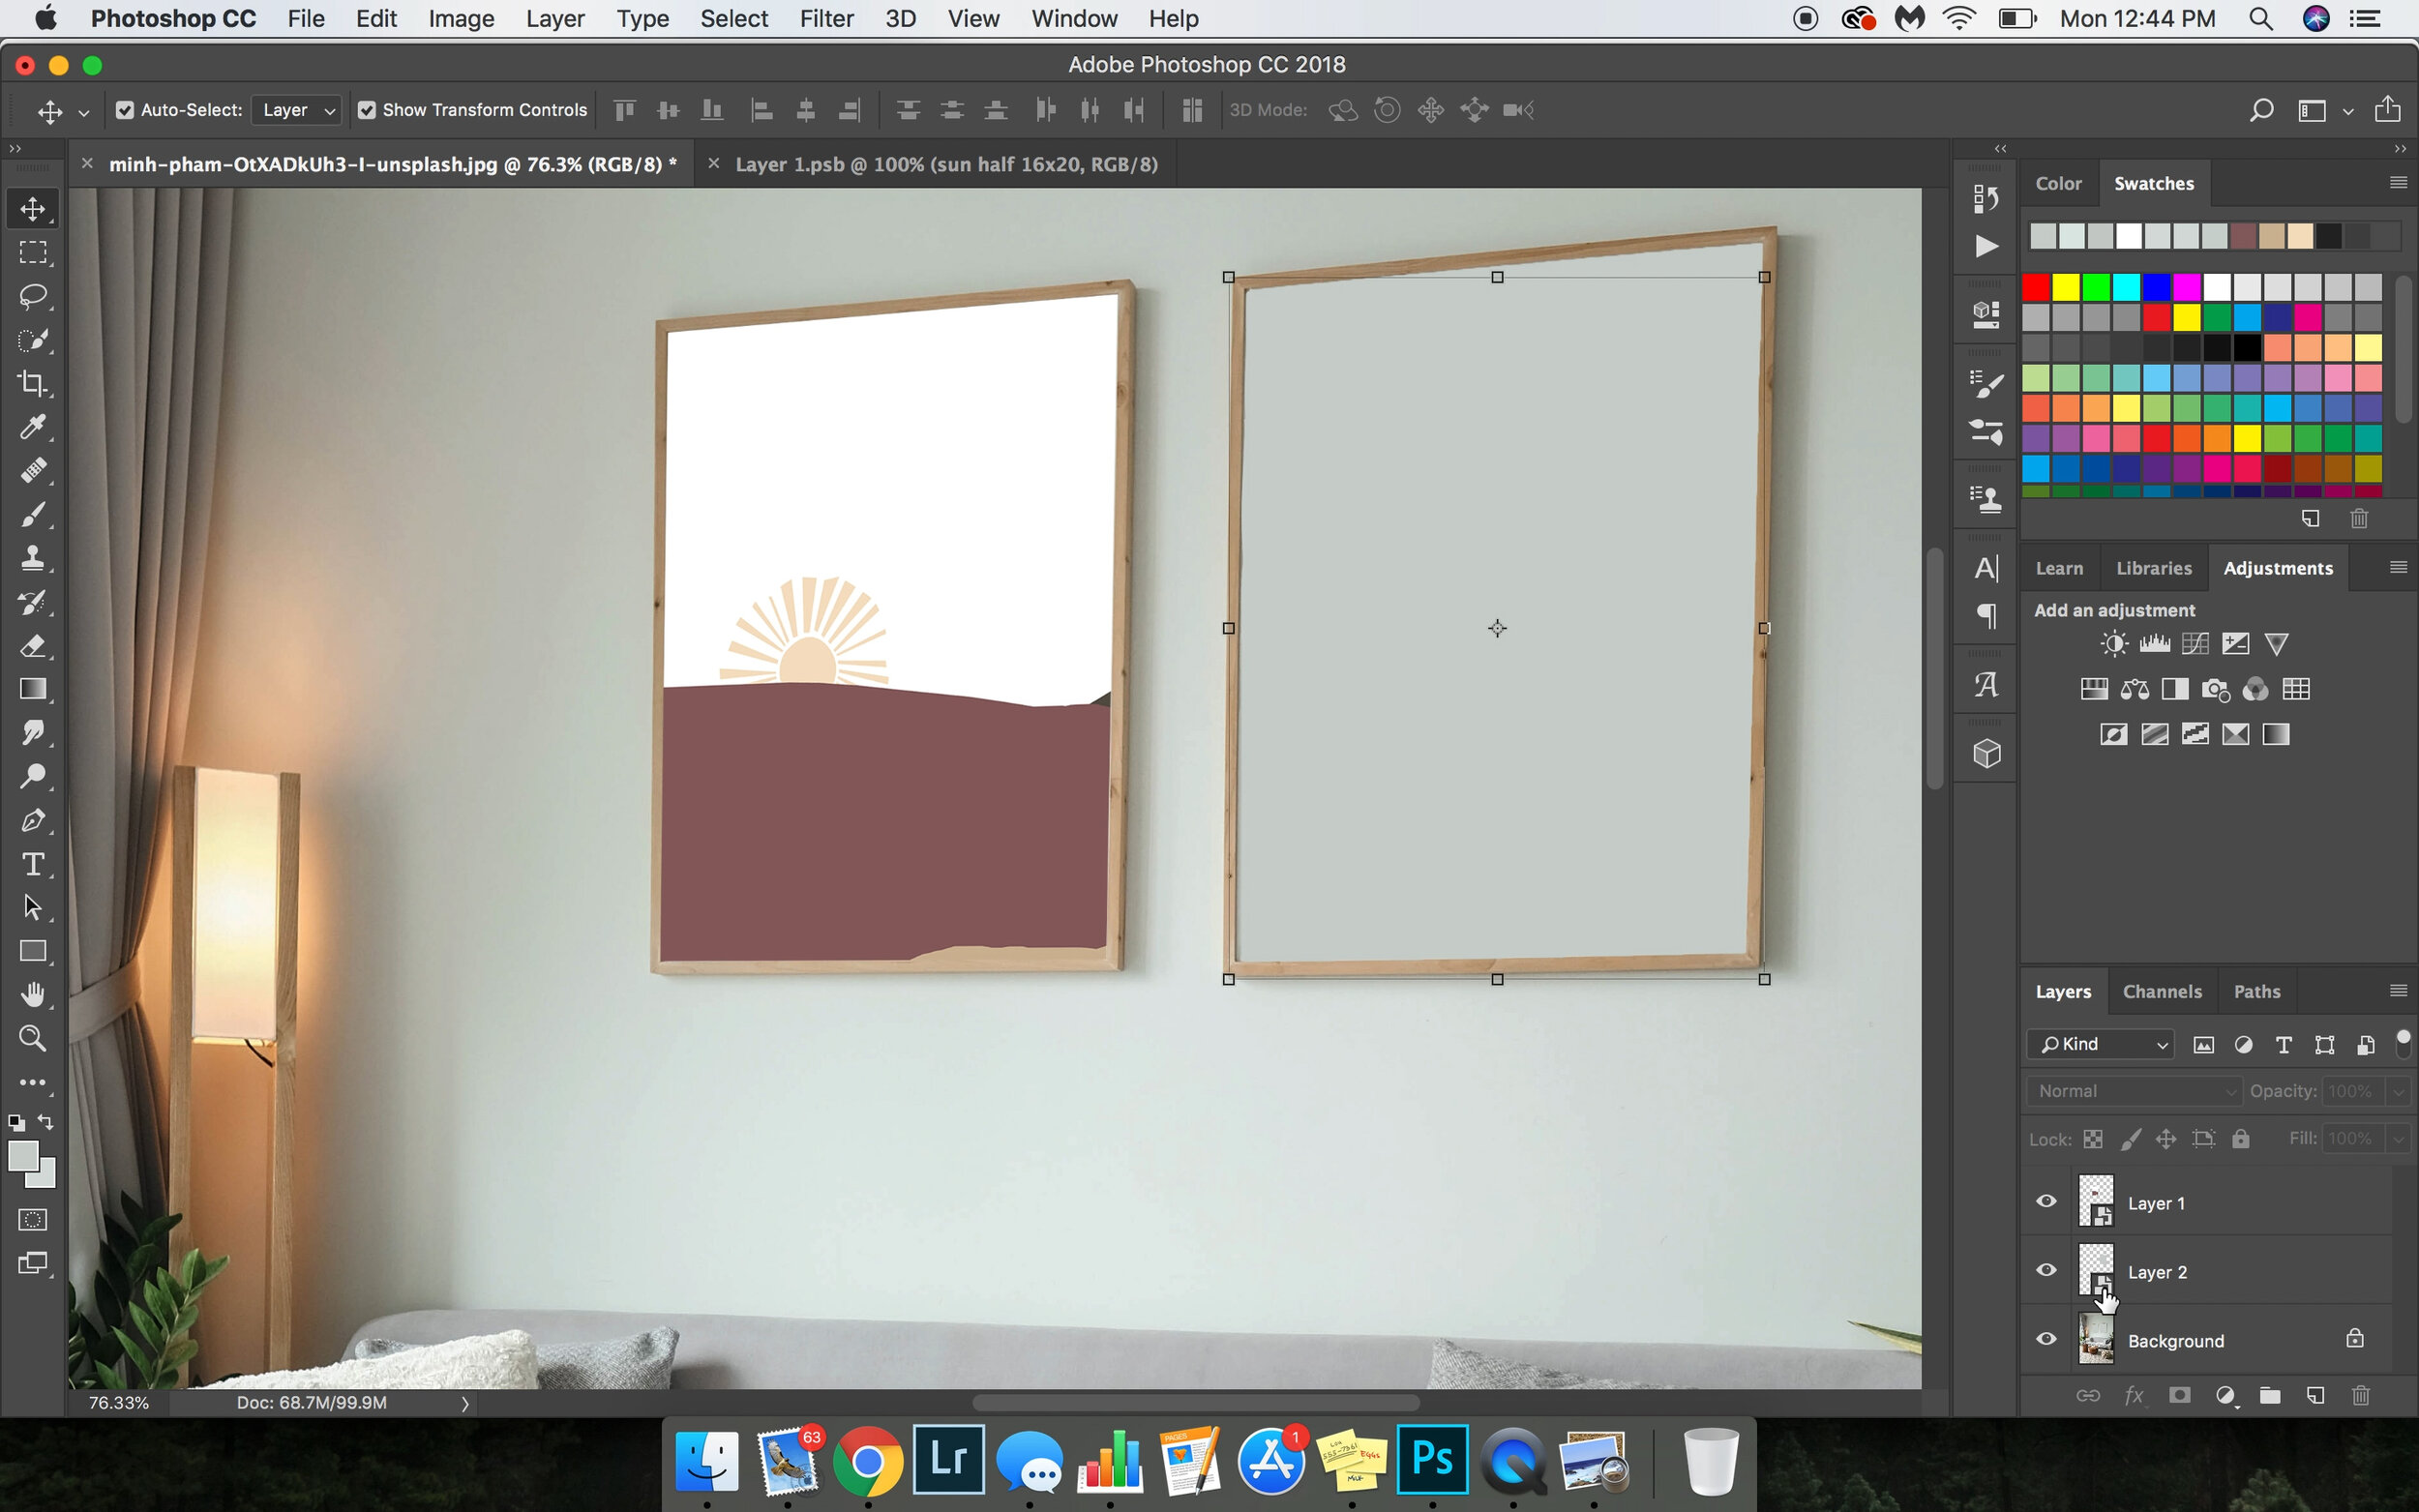


Step Eleven: Change the Mode of the layers to Multiply or Darken (sometimes Darken or Multiply will make parts of the design disappear so check which one works best for your artwork).

Step Twelve: Done! Save as a JPG for your Etsy listing and as a PSD file to keep the smart layers and use again for other projects.

Hope this all helps! Comment if you have questions! Thanks :-)

20 Blog Prompts | Blog Topics for Small Business Owners
If you’ve recently read my post about increasing your online presence or if you are a bit intimidated on where to start, here are some good topics to start with when it comes to blogging both for SEO purposes and personal.
Blog Topics for Small Business Owners by Colorado Wedding Photographer Molly Margaret Photography
If you’ve recently read my post about increasing your online presence or if you are a bit intimidated on where to start, here are some good topics to start with when it comes to blogging both for SEO purposes and personal.
Personal Sharing
- Five things people don’t know about you
- How you met your spouse/partner
- Significant event stories: buying your home, having children, family story
- Interview your child and get their perspective on things
- Write a letter to yourself, either 5 years ago, younger, now, 10 years from now etc
- Favorites: restaurants, travel locations, recipes
- Your WHY: Why you do what you do, the reasoning behind it all
- 10 things you’ve learned over the past 10 years
- Most embarrassing moment
- Share a hobby you have tried or do regularly
Business Related
- Your business goals for this year
- Your workflow from start to end
- Five things you’ve learned from your business
- Then & Now post (beginning of career versus now)
- Talk about something that failed in your business and how you fix it
- Frequently Asked Questions you receive
- The history of your business
- What tools it takes to do your job
- How much it costs to do your job
- Myth vs Fact in your industry or common misconceptions
I hope these ideas help get your creative juices flowing! Also, can we acknowledge that is one of the weirdest sayings? Glad we agree!

What's in My Camera Bag? A Guide to Photography Equipment | By Colorado Wedding Photographer Molly Margaret Photography
The items on this list are Nikon compatible, if you’re canon or otherwise they might work for you but always check the links and specifications :-)

Probably the most common questions I get are -
What equipment do you have? - Or - What should I buy as a beginner photographer looking to transition into more professional equipment?
Here’s an easy breakdown, also I’ve included links and pricing - approximate as of the date this was published. The items on this list are Nikon compatible, if you’re canon or otherwise they might work for you but always check the links and specifications :-)
Alright, lets dive in here!
| camera body |
First things first, my camera, I shoot with two Nikon D750s. I always recommend two camera bodies for the following reasons:
In case one breaks, you should ALWAYS have backups of any equipment, especially the most important one - your camera.
To achieve different purposes with each camera. For example: I use one for video and one for still frames, or one for tight lens captures and one for a more wide lens.

Nikon D750 - $1497
The Nikon D750 was voted camera of the year, and is an FX format camera - meaning it is a full frame camera. If you plan on shooting both video and still photography, it’s a good transition between the two. It has the following features:
24.3 megapixels
6.5 frame per second continuous shooting
ISO 100 - 12,800 (expandable up to 51,200 (aka it’s great in low light))
Full HD video - 1080P 24-60/fps
WiFi Built In (you can download an app to take images / upload without an added external shutter)
Not ready for all that? Here’s the first DSLR I purchased, and shot a wedding on! It’s the Nikon D3300 and it’s only about $500 with a lens included.
| lenses |
Okay, next up we have lenses. There’s a large debate on if you should shoot prime lenses or zoom lenses. I don’t care what you shoot, and heck I have a backup lens that is a zoom. But if we’re talking preferences and what I actually shoot 99.9% of my weddings on - it’s a prime 85mm and prime 35mm lens. So do you boo, just be sure to invest in good quality glass - preferably full frame.

nikon af nikkor 85mm f/1.8g $477
The 85mm is a prime, full frame lens and perfect for moments during ceremonies or guest candids without getting too close. Plus it’s so great for portraits. Next is my favorite wide angle prime lens.

Nikon AF-S NIKKOR 35mm f/1.8G $527
I use the 35mm for those wide environment shots and for engagement sessions, it’s incredibly versatile!
Remember when I mentioned backup equipment? My backup lenses are a Nikkor 50mm 1.8 and Nikkor 24-120mm Zoom lens
| FLASHES + LIGHTING |
A standard issue to have to deal with while shooting a wedding is bad lighting. Churches, receptions and getting ready rooms are notoriously dark or lit poorly. To combat this, I use several lighting sources outside of the sun.

Nikon SB-700 Speedlight - $327
I own two of these flashes for OCF (off camera flash) purposes. OCF can be extremely beneficial during receptions and will help remove grain from dark images as well as light your subjects well in dark spaces.
Another good resource with flash photography is an add on like a diffuser. I use the magmod system because of its versatility.

MagMod Starter Set - $100
This set will work on any size flash and you can swap it from one to another - I use it at every wedding!

NEEWER 160 LED CN-160 - $22
(yep, that inexpensive)
Another option with external lighting, especially helpful is continuous lighting. Continuous lighting systems are particularly helpful with videography. My video lights are very early starter equipment but they have great customer service and I’ve used this specific light system at multiple events.

Westcott 9908 8-feet Lightweight Stand - $39
Now that you have all these lights and modifiers and you’re hip to that off camera flash thing, you need somewhere to put the lights, I use these Westcott light stands because they’re easy to transport and they are super lightweight. To attach the flashes I use this modifier which will work with the flash hotshoe.

Yongnuo YN-622N, Yongnuo YN-622N YN 622 Wireless I TTL ITTL HSS 1/8000S Flash - $78
To get the flashes and camera to communicate you need transceivers, I use Yongnuo and apply this to my two SB-700s.
| video equipment |
In addition to the continuous lights I posted above, I use a gimbal and tripod to stabilize my video shots.

| Straps and Holsters |

Still hanging in there?? Ok, final items I use are a Clydesdale Pro-Dual Handmade Harness to carry my cameras if I’m using both at the same time. If it’s just one at a time I use a Neoprene Quick Release Safety Tether, Camera Sling.
I hope this list is beneficial, theres so much more than goes into it like SD cards, a good camera bag and a BILLION BATTERIES. But this is a good start! Please note this blog contains affiliate links, as an Amazon Associate I earn from qualifying purchases. :)
Have any questions for me regarding equipment or what I keep in my camera bag? Reach out to me here: hello@mollymargaretphotography.com

Tips for photographing families and children | By Colorado Family Photographer Molly Margaret Photography
I often get asked How can I improve my family photo taking skills? Especially around the holidays when people are taking photos of their loved ones at events and at home. I’ve compiled a quick list for reference here:
I often get asked How can I improve my family photo taking skills? Especially around the holidays when people are taking photos of their loved ones at events and at home. I’ve compiled a quick list for reference here:
TIPS FOR PHOTOGRAPHING FAMILIES + CHILDREN
Capture the family in their genuine embrace, encourage them to hug each other and goof around
Get on the same level, having parents crouch down when posing with young children can help create a more controlled final portrait
Photograph from above to get small faces and features in focus
Bring small toys or play cartoons above the camera for small children
Remember to capture individuals of each child
Talk with the family beforehand and review clothing choices for a more cohesive image
Have parents interact in photos to show closeness
Pair up families with matriarch/patriarch in center and build outward with family units alternating for standing posed larger groups, shoot in a higher f/stop to ensure members are in focus and be sure to "window" people so you can see them clearly
COMMON MISTAKES WHEN PHOTOGRAPHING FAMILIES AND CHILDREN
Expecting young children to pose, or cooperate for an extended amount of time
Not checking for stains/messy hands/hair
Forgetting to get photos of individuals or pairs beyond the entire family
Not coordinating outfits in advance that match each other and the enviroment
Not coordinating an appropriate location (aka getting permits as needed, picking outdoor spots in bad weather)
Forgetting to remove sunglasses
Shooting a too low F/stop so members are not in focus


Five Things to Consider Before Changing Careers | By Colorado Wedding Photographer Molly Margaret Photography
When I made the decision to leave my corporate job in insurance claims to pursue wedding photography, I’ll admit I was excited and terrified at the same time. I had spent 7 years with my previous employer and felt almost as though I was just abandoning my life plan.

When I made the decision to leave my corporate job in insurance claims to pursue wedding photography, I’ll admit I was excited and terrified at the same time. I had spent 7 years with my previous employer and felt almost as though I was just abandoning my life plan.
I started my corporate career with ambitions of management, power suits and high level meetings. After changing departments, going through promotions and then starting a family I began to realize my aspirations had changed. I stressed hearing my work phone ring, struggled to balance social time in my office and constant stories full of negatives took over my home and work life.
I started taking photos in high school after observing my grandfather and mother constantly capturing our moments at home. For my 15th birthday my brother purchased me photoshop and my first digital camera. ‘It’s this or drivers-ed,’ he said to me. From then on, I depended on friends and public transportation for rides a lot more but the creative in me flourished. After giving birth to my son 10 years later I upgraded my equipment again and people began asking me for photos of their families as well. I came to love weddings through natural progression and never looked back.
So here are the five things to consider before working from home:
1. It’s insanely lonely | I spend my days listening to podcasts or with Netflix streaming because the silence is almost deafening. I loved talking to coworkers (ok, maybe too much) and trips to get coffee or donuts in the break room just cannot be replaced.
2. You really become part of a unique community | How often do you and your coworkers get together now? Every week, month? Quarterly? The beauty of creatives is there are always events to attend, masterminds to delve into, groups to engage with and marketing lunches. I was intimidated to list “photographer” as my job description (hello - just updated my LinkedIn like a week ago) until I realized the massive community that thrives being just that, and so much more!
3. Your family life and personal relationships change | I just planned a trip to Wisconsin with no worries as to putting in for time off or letting several people know I won’t be in the office. I make my own schedule and can accommodate any work needed on the road - or just put up an away message and disconnect for the weekend. After my son was struck with an illness I didn’t need to worry about being written up for having used too much sick time, I was simply able to make adjustments to my schedule and devote my time to making him better.
On the opposite end of this spectrum however, you are responsible for your schedule and sometimes that means working from 11pm to 1am so you can spend extra time during the day with your little ones or turning down those ladies nights for events you’re either working or attending.
4. Your creative path may change - and that’s ok | When I quit my corporate job I had a clear and concise plan of what I wanted to do and where I saw my business in a year. Then things changed. When you’re running your own business there are more influences than just the occasional schedule change or flight for a work training. Having structure is crucial to success but you’ll soon realize your initial path isn’t working, fulfilling you, or heck, even paying your bills. You’ll need to know how to be flexible and reevaluate.
5. Taxes, insurance, cost of doing business, personal finances, life insurance and disability insurance | I was lucky enough to have a financial advisor husband who helped exponentially prior to me leaving my job but I hear about entrepreneurs and business owners struggling with this almost weekly. Setting up insurance, a savings plan and having a realistic idea of what taxes and your business will cost to run is crucial to - how do I put this lightly - not fall flat on your face in your first year of business independently.
So, is the transition to creative the right path for you? If you read this list and were like - well that sounds like the worst thing, ever. Maybe it isn’t - for now. For those of you who literally end this with the thought ‘shut up and take my money,’ well then, I’ll see you at the next creative meet up.